How to Measure a Roof for Solar Panels
Here are instructions to measure and prepare a roof for solar panels. Ultimately this solar system design will determine the total dimensions (height and width) of the array layout in rows and columns. To measure a roof, all that is needed is a tape measure, pencil, paper, and some common sense. These instructions will guide you through the process. If you need help, for a small fee, or for FREE if you purchase a solar kit from us, we offer PROFESSIONAL SOLAR DESIGN
First, measure the total area of the roof height and width. The roof height is measured from the top vertical peak to the bottom edge or gutter line. The roof width is measured from eave-to-eave or the left edge to the right edge. Draw this total roof area on a piece of paper, noting the top peak, bottom and eaves.

Next, measure any areas on the roof that may account for gaps due to vents, pipes, roof fixtures, or tree shading. If the panels are to be tiled, be sure to allow for adequate space between rows or columns so that the panels do not shade one another. If panels are to be flush-mounted (parallel to the roof surface), then this is not needed. Mark all gap areas to scale on the roof drawing.
Now measure 3 feet from the top peak, bottom gutter line, and the eaves. This 36-inch area around the array will ease installation, accessibility, or maintenance and provide strength for wind resistance. This is considered a best practice for solar system design. If space is limited, the panels can be mounted with less space up to the roof edges, but this is not recommended. Mark this space on the drawing.
Now determine the number of rows and columns to fit the solar panels in the available roof space. Start by finding the dimensions of a single solar module. Each panel is generally 65" x 39" (17.4 sq ft per panel) with a variance of a few inches depending on the specific model chosen. You can find the panel dimensions for your chosen model on the specification or datasheet. The solar panels available at SunWatts will include the panel dimensions.
The number of rows and columns used in the layout do not have to be uniform. You can have 1 row of 4 panels and another row of 5 panels. The basic rule is to work with whatever fits. However, keep in mind the look and aesthetic appearance of the array.
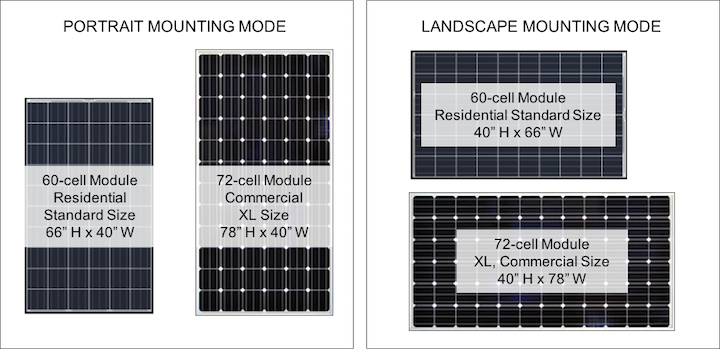
The panel orientation or mode can also vary, but a consistent approach is easier to install and generally looks better. See the following illustration to understand the difference between a portrait and a landscape orientation. Modules mounted in portrait are taller from top to bottom, while landscape mode modules are wider from left to right.
If using top mount clamps, be sure to allow one (1/4") inch between panels for the top clamps.
Other measurements to note include the roof joist spacing, the roof pitch, wind pressure, and snow load. The national standard for spacing between roof joists is 16" on center. This will impact where the roof attachments and mounting rails can be placed. The roof pitch measures the slope of the roof. This will be used to determine if your panels can be flush-mounted or if additional tilting of the panels is desired for optimal Sun exposure. HOW TO MEASURE ROOF PITCH.
To determine wind or snow load, the location zip code can be used to reference various look-up tables. All these factors will impact the placement of roof attachments to ensure adequate strength of the solar array mounting racks. The type of attachment used is primarily dictated by the roofing material. The typical roofing materials are shingle (asphalt, wood, concrete, ceramic or stone), S-tile (like Spanish tile) and metal (standing seam).
For more information, visit the solar installation checklist to see many of the steps involved in safely building a solar power system.
